Tool Scaffolding
Written by Jerred Sonneborn, CSDB School for the Blind TVI
The most entertaining aspect of working in the vision field and special education is utilizing my creative traits. One of the privileges of working at CSDB is the access I have to the abundance of adapted math tools that I can provide to my students. However, there are times where I must dive deeper into the adaptation of tools to accommodate the needs of students.
Recently, I have taken a step back to observe what needs must be met to obtain student motivation, accessibility, success, and understanding. I look for the gaps and struggles a student may have using a tool and think how can I make this more accessible for them? For this to come to light, I first focus on the motivation piece. What will draw a student to enjoy this tool but also provide the input needed to understand the topic presented? What can I do to make this tool stimulating enough to keep the student engaged but also understand its purpose? When those questions are answered, I then proceed to create a tool that is adapted to their physical needs. Finally, I figured out what I need to create for the content to make sense to the student and appropriate contrast for the students using the tool and lead to success.
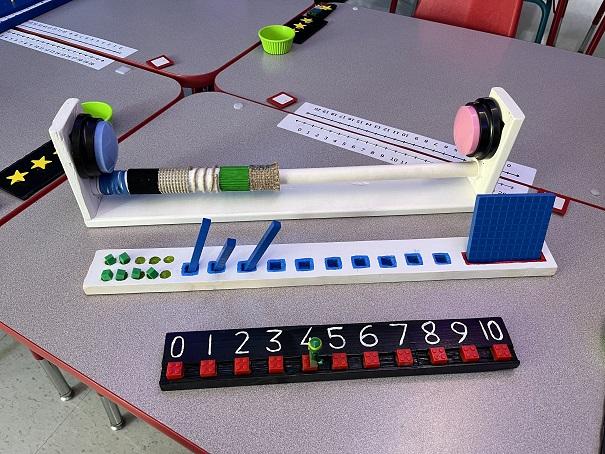
The most recent tools that I have adapted/created pertain to one-to-one correspondence, place value, and addition/subtraction as seen in the photo.
Tool 1 (far back) is a universal counter. This tool allows the student to manipulate the counters with control and emphasizes the concept of sliding to the right for addition and left for subtraction like on a number line as well as organization for 1:1 correspondence. The buttons are voice recorders where I will record “plus one” and “minus one” or whatever vocabulary I want to target that day. The buttons serve as the motivation piece for the student that uses this tool. Each counter is also a different texture for both tactile stimulation and to emphasize that each number is different in value. An example of how this tool is used is the student is given an operation and a number (+2). They will slide one counter at a time to the right and hit the button each time being reinforced with the language of “plus one” or “one more.” This tool can be used as well for
Tool 2 (middle) is a place value base-10 block holder. Each block type has designated slots that will only allow the designated block to fit in the slot. Each place value is color coordinated to the assigned clock to provide the student with that visual aid. What had inspired this creation is that a student loves to stand the blocks upright but does not have the fine motor control to do so. The slots allow for the student to set the blocks up their desired way and stay organized.
Tool 3 (front) is a number line with LEGOs at each number on the line with a LEGO person as a placeholder. This tool is used for counting, addition and subtraction, and rounding. The idea behind this tool is to make a fun and play-based twist on a typical number line, a tool that I readily use especially with our younger students. This also puts an emphasis on fine motor skills.